Introduction
What we are going to be doing is creating a low resource FreeBSD Jail used as a docker or container system to host our Nginx Proxy. You could do this same let’s encrypt on the actual NextCloud instance. The reason we’re doing it this way is because when the jail or plugins update, it can possibly break some customizations and such.
Creating your Jail
- Get logged into your TrueNAS.
- Go to “Jails” on the left hand side.
- Add a jail using the “Add” button at the top right.
- Give it a name, leave jail type on default, select version, and click next. (We are using version 12.2-RELEASE)
- We are selecting “DHCP Autoconfigure IPv4” as ours is temporary but you can set up a static IP here, then click next.
- This will bring you to a summary of what you have selected and then choose submit.
- Select your new jail you created and choose “Start”.
Turning on SSH
- In the TrueNAS, go to “Services” tab on the left.
- Scroll down until you find “SSH” and click “Configure” (Pencil Icon).
- Check “Log in as Root with Password”.
- Click Save, and turn it on by selecting the slider to run.
SSH into TrueNAS
- SSH into the TrueNAS using
ssh root@192.168.11.171(IP will most likely be different for you. Change accordingly). - Run the command
iocage listto show all of the Jails that are running. - To get into the jail, type
jexec 1 tcsh(You will change the number depending on what jail you are trying to get into from the list).
Running Updates and Installs
- To update, you will run
pkg update - For installs, we will run
pkg install nginx nano python(This will install nginx, nano, and python) - Type “Y” to confirm the installs
- Input
sysrc nginx_enable=yes(This tells nginx to start when the Jail does). - Type
pkg install py38-certbot openssl(You can tell which python version to pick by scrolling up a bit until you see the standard python modules. Yours may differ).
Starting the nginx Web Server
- Grab the ip by typing
ifconfig - Start nginx using
service nginx onestart - Type the IP gotten from step 1 into a web browser. If you see a “Welcome to nginx” then it has been successfully installed and is working. Now all it needs is to be configured.
- Stopping nginx can be done using
service nginx onestop
You will need to port forward in your router both port 80 and port 443 to the ip address of the nginx jail.
Cert Setup
- You will need to purchase a domain if you do not already have one.
- After that is done we need to create a cert. We will do this in the SSH client by typing
certbot certonly --standalone -d 'Domain'(Input your domain name in ‘Domain’). - Take note of where your Certificates are located (Should be .pem files)
Configuring nginx
- Get into the config for nginx by going typing
cd /usr/local/etc/nginxthenlsto show files inside. - We will then use nano to configure nginx. You do this by typing
nano nginx.conf - Scroll through your file until you find server.
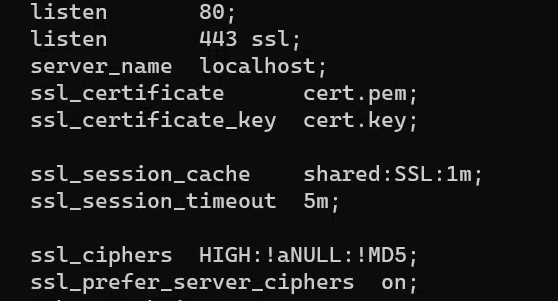
- Input
listen 443 ssl;underneathlisten 80;

- Scroll down to HTTPS server and copy from
ssl_certificate cert.pem;tossl_prefer_server_ciphers on; - Scroll back up to server and paste that under
server_name localhost;delete the # from the front.

- Grab and copy cert location and paste the entire location where cert.pem is in nano. The location’s you copy should look like /usr/local/etc/letsencrypt/live/gg132.get2.li/fullchain.pem and /usr/local/etc/letsencrypt/live/gg132.get2.li/privkey.pem.
- Press Ctrl+X to save the configuration.
Setting up NextCloud Instance
- Nano into the nginx.conf file once again and scroll down to Server once again.
- Input the proxy pass. Your location should look similar to this

- Start nginx using
service nginx onestart - Open your domain name in a web browser using https and you should now be able to login to your NextCloud.
location / { # root /usr/local/www/nginx; # index index.html index.htm; proxy_pass http://192.168.11.171:8282; }
Full Video
SUPPORT MY WORK
Hire US Buy Me a Coffee TECH I USE AND RECOMMEND Tech Kits [Domain Registrar](https://hover.evyy.net/YGg4j
- Kevin Stevenson
- Tuesday, Nov 23, 2021
